Sourdough bread is often known as the healthiest bread, and there’s a science behind that moniker. Although bread is a staple, many have trouble digesting it and it could be one of the worst things to eat if a person has a gluten intolerance. But sourdough bread could be the solution and a naturally healthy one at that!
So what exactly makes sourdough bread so much healthier and better for digestion than commercially made bread?
Part of the reason that sourdough bread is so healthy is the reduced phytic acid in sourdough bread thanks to the different fermentation process. Phytic acid is actually so hard on the body, it is considered an “anti-nutrient” by some. Phytic acid is a component found in the bran portion of all grains and beans. It impairs the absorption of iron, zinc, and calcium because the phytic acid molecules bind with the minerals, which make these important nutrients unavailable to the body for use. Sourdough fermentation is much more efficient than yeast fermentation in reducing the phytate content in whole wheat bread (-62 and -38%, respectively).
The lactic acid bacteria present in sourdough enhances acidification, which leads to increased magnesium and phosphorus solubility. Long slow fermentation of wheat can reduce phytates by up to 90%! Some recent studies have even indicated that those who are intolerant to wheat are able to tolerate sourdough bread because the old-fashioned fermentation process has been shown to break down the gluten in the wheat in the process.
*We still suggest steering clear of ALL bread including sourdough if you have Celiac or a major intolerance to gluten; unless the bread has been made with gluten-free ingredients. Better safe than sorry. We have included a gluten-free flour option in the sourdough bread recipe in this article for our friends who do live a gluten-free life!
Sourdough bread won’t spike your blood sugar either. Sourdough bread is rated lower in the Glycemic Index (a system that ranks food based on its effect on blood sugar levels) than other types of bread because of the build-up of organic acids. These naturally occurring acids make the minerals and vitamins in flour more available than they might be in other bread, and reduce the rate at which glucose is released into the bloodstream. Despite its significant carbohydrate content, which is usually an indication of a high glycemic index food, sourdough bread has a glycemic index of only 53. This makes it a low-glycemic-index food. As with other low GI food, sourdough bread will likely cause only a gradual increase in blood sugar levels rather than a spike.
There are also probiotics in sourdough bread that make it a better choice than the commercially processed bread at the store. Probiotics help to support the gut microbiome. Probiotics are the gut bacteria that aid the body in healthy digestion. While gut health can help balance your mood, stress levels, hormones, and some of the other somewhat invisible aspects of your health, it’s often misunderstood as being an agent for weight loss or dieting. Gut health is really just assistance for your digestive system. However, the mass-produced sourdough sliced in a popularly branded loaf is likely lacking when it comes to any real probiotic benefit. So that’s why you will want to make your own!
SOURDOUGH STARTER RECIPE
All you need to make your sourdough starter is flour, water, and a container large enough to hold 2 quarts to keep it in.
*For a gluten-free alternative, try brown rice flour.
- Day 1-2: In a clean jar or container: add 1/2 cup flour (unbleached white, whole wheat, rye, brown rice*), and 1/2 cup water.** Please note – If you do not want a major mess on your hands, do not screw the lid to a glass jar for your starter! Stir the flour and water until combined and allow this mixture to sit for 2 days on the counter (covered with plastic wrap or a canning lid that is not completely fastened) at room temperature.
- Day 3: Observe the dough. If you have bubbles, add 1/2 cup flour and 1/2 cup water. Stir together and let sit for one day. If you don’t have bubbles, allow the dough to sit for another day and observe.
- Day 4, 5, 6: Add 1/2 cup flour and water to the jar and stir on each of these days to build the strength of your starter. Let it sit at room temperature after each stirring. By the 6th day, your starter should seem mildly bubbly and it will have a pleasant sour smell building up. Add more flour and water so you have at least 3 1/2 cups of starter to use in a batch of dough.
- Day 7: By this time, the starter will be actively bubbling and puffy. This indicates that your starter is ready for use.
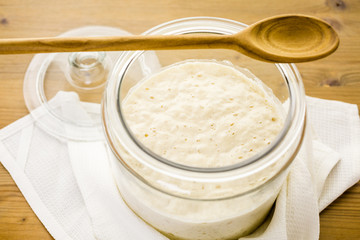
Your sourdough starter looks like this when it’s ready:

- Ingredients
- 1 cup ripe sourdough starter
- 1 3/4 cups lukewarm water
- 5 cups flour
- 1 tablespoon salt
- Instructions
- Combine all the ingredients in a large mixing bowl, or a large (6-quart) food-safe plastic bucket.
- Mix and stir everything together to make a sticky, rough dough. If you have a stand mixer, beat at medium speed with the paddle attachment for 30 to 60 seconds. If you don’t have a mixer, just stir with a big spoon or dough whisk until everything is combined.
- Leave the dough in the bucket or 6-quart bowl, cover it with the bucket’s lid or a piece of plastic wrap, and let it rise for 1 hour.
- Gently pick up the dough and fold it over on itself several times, cover it again, and let it rise for another hour.
- Repeat the rising-folding process one more time (for a total of 3 hours), folding it again after the last hour. Then, place the bucket or bowl in the refrigerator, and let the dough rest for at least 8 hours (or up to 48 hours).
- When you’re ready to make bread, turn the dough out onto a well-floured work surface, and shape it into a rough ball. Leave the dough seam-side up, cover it, and let it rest on a floured surface for 15 minutes.
- Next, shape the dough to fit the vessel in which you’ll bake it: a 13” log for a long covered baker, or a large boule (round) for a round baker or Dutch oven. Place the shaped dough into the lightly-greased or semolina-dusted base of the baker and cover it with the lid.
- Let the loaf warm to room temperature and rise; this should take about 2 1/2 to 3 hours. It won’t appear to rise upwards that much but will relax and expand.
- With a rack positioned in the middle, start preheating the oven to 500°F one hour before you’re ready to bake.
- Just before baking, dust the loaf with a fine coat of flour and use a knife to make one or several 1/2” deep slashes through its top surface. If you’re baking a long loaf, one arched slash down the loaf lengthwise is nice, or if baking a round, a crosshatch or crisscross pattern works well.
- Cover the baker with its lid and place it in the oven. Reduce the oven temperature to 450°F and bake the bread for 45 minutes.
- Remove the cover of the baker and bake the bread for 10 to 15 minutes longer, until the bread is deep golden brown and crusty, and a digital thermometer inserted into the center of the loaf reads at least 210°F.
- Remove the bread from the oven and transfer it to a rack to cool completely.
- Store leftover bread in a plastic bag at room temperature for several days; freeze for longer storage.
The flavor of homemade sourdough bread is incredible and you will still be making a large batch of dough and storing it for up to a week, so you will do the work on one day for many loaves.
source : Sara Tipton


