Bull Busters, Buck Busters, Poor Man’s Slug, Ringers. No matter the nomenclature utilized, all these  colloquialisms refer to a method of shotgun shell transformation we’re going to call “cut shells”, shotgun shells which have been cut around the circumference of the outer hull. When these sliced shells are fired, they turn the shotgun shell itself (typically filled with birdshot) into a de facto “slug”. A neat idea, yes; but why would someone do this? The concept of the cut shell has been around for a very, very long time. My grandfather told me about when he was growing up in the Adirondack Mountains during the Great Depression, they couldn’t afford multiple guns and ammunition.
By Drew, a contributing author of SHTFBlog & Survival Cache
 To keep meat on the table, the family’s lone single-barreled break-open Iver Johnson 12 gauge shotgun had to be used for everything from pest control to small game hunting to big game hunting. Usually all they had were birdshot loads to make do, so the old waxed cardboard shotgun shell hulls were transformed into cut shells, and used in lieu of slugs for whitetail deer hunting.
My grandfather bagged his first deer with a cut shotgun shell, and many other critters fell to him and that old shotgun using the same method. It was effective and inexpensive – two qualities that worked well in a poor region at a poor time.

And of course, this translates well into the emergency prepper mindset. Made do with all you have – and if all you have is a handful of #6 birdshot, this is a way of turning a less-than-lethal wounding hit with birdshot hit into a decisive, clean kill. However, there IS a potentially severe danger involved, so it definitely should only be used in emergency situations. Let’s dig deeper.
The “How” Of A Cut Shell
“For Informational Purposes Only – Do Not Try This At Home.” – How does one make a cut 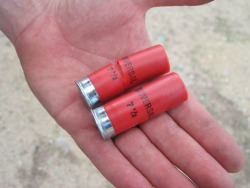 shell? Very simply, really. Take a convenient cutting tool and cut around the circumference of the shotgun shell, the round way. Make two cuts on opposing sides of the shell, all the way through the outer hull only. Don’t cut into the innards of the shell; you don’t want to disturb those. Make sure the two cuts don’t connect – leave a sliver of material between them, enough to keep the shotgun shell together. However, you want to leave the remaining connecting material thin enough so that it will easily separate when fired. The best place to perform the cut is around the “shock absorber” portion of the inner shot cup wad – this way you don’t chance cutting through the wad petals and having a bunch of shot fall everywhere. Cut this way, there is also minimal risk of getting into the portion of the shell that houses the gunpowder propellant. Running a knife through there shouldn’t be a danger unless it sparks; the most pertinent danger is that gunpowder could be dumped out, igniting later at what could be a terribly inconvenient time.
Also Read: Survival Shotgun Selection
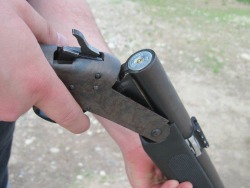 A serious matter to note is that cut shells should not be used through a repeating shotgun, namely a pump, semi, or lever action. These almost always feed through tubular magazines, and the shells are raised into the chamber through a series of levers, arms, and cartridge stops. All of these parts are prime antagonists at catching and ripping your mostly-cut-through shotgun shell apart, jamming the action or spilling shell contents everywhere. The cut shell concept should really only be used in break-open type shotgun actions for this reason. Better safe than sorry.
The Why
Why would you do such a modification to a perfectly pristine and otherwise useful shotgun shell? 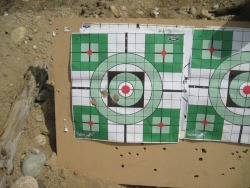 Because a cut shotgun shell essentially transforms a column of birdshot into a single large plastic-cased bullet. Birdshot by itself has very poor penetrating qualities, especially when you get to ranges out past 10 or 15 yards or so. At these distances and further, the shot turns from a relatively solid column of pellets into a rapidly-dispersing pattern that grows larger geometrically the further one gets from the target. While this is wonderful for shooting moving small game like a flushed partridge flying at full throttle, it is much less than optimal for dispatching large game. Small shot is very light and does not retain enough energy or velocity to penetrate deeply enough through heavier critters to do telling damage to bone structure or vital organs.
What the cut shell accomplishes is this: it keeps the mass of light shot coagulated together, encapsulated in the outer hull of the shotgun. This keeps the shot from dispersing, and creates a large, heavy, concentrated “slug” that can penetrate much more deeply than just the shot on its own. I’m told (and certainly believe) that it acts very similarly to the shot-filled handgun rounds made by Glaser, which allowed the projectile to penetrate, and then release a devastating array of shot once inside the target. This causes massive tissue damage that would be hell to pay if anywhere near a vital soft organ. There are many stories online of people shooting deer in the boiler room with a cut shell, and the deer simply cease to carry on with what they were doing. Instantaneously. It’s a potentially tremendous advantage when you have an ammunition limitation, and worth a consideration when you’re in an emergency situation.
The Why Not
 Why just in an emergency situation? Because cut shells can be very dangerous. Not from the shotgun shells exploding or coming apart when you shoot them – but because of overpressure conditions. How? Well, according to my trusty Vernier calipers, the outside diameter of a 12 gauge shotgun shell is 0.789” The standard bore diameter of a 12 gauge shotgun is 0.729”. See where I’m going with this? The outside casing of the hull – the part that travels down the bore with the shot – needs to compress 0.060”, or almost 1/16 of an inch, while being booted down the bore by a tremendous pressure spike from the propellant behind it. This compression isn’t easy to achieve, since the interior of the hull is filled with shot, and the shot isn’t exactly that compressible either. Getting the cut shell to accelerate down the barrel while being squished on all sides raises pressures ferociously inside a barrel that really isn’t designed to take a lot of pressure.
Thankfully, most shotguns have what is called a “forcing cone”, which is a long, tapered length of the interior of the barrel that gradually brings the shot down from the .79” or so of the chamber down to the bore diameter. If the bore diameter changed abruptly, you’d gave a 12-bore grenade on your hands. But this is the saving grace of the cut shell, if there was one to be considered; it allows the cut shell “projectile” to gradually be compressed. However, one thing to keep in mind: Not all shotguns have equal forcing cones. What may work in one shotgun like greased lightning may put the boots to another. Just something to consider, and the reason why I’m telling you not to do this unless you have an emergency situation.
Also Read: 6 Reasons You Need A Survival Shotgun
You also have to remember the choke at the end of the shotgun barrel. The choke is another constriction in the barrel that helps regulate the cone of shot spread through more bore tightening. Improved cylinder chokes are minimal chokes and will provide the least constriction. Modified and Full chokes provide incrementally tighter bores – full choke bore diameters are .689”, squeezing that hull another .040”, providing that much more pressure. Granted, it’s at the end of the barrel and that alleviates the issue somewhat, but it still does cause a potential problem. The more open the choke, the better. Projectiles running through restrictions in the bore also increase recoil.
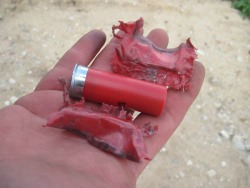
Another thing to watch out for is that the shotgun shell may become uncrimped as it travels down the bore, with the shot column pushing its way through the cut hull. This can leave the hull remnant INSIDE the bore of the gun. Pulling the trigger on another shotgun shell without clearing the bore will lead to the same results as if you’d had a bore blockage in a .30-06 or any other caliber: catastrophic gun boo-boo at best, an exploding gun and wounded or dead shooter/bystanders at worst. So, this is problem number two with cut shells, and another reason repeating shotguns should be avoided if you need to utilize this trick. Always, always, ALWAYS check your bore every time after you drop the hammer on a cut shell.
Testing the Cut Shell
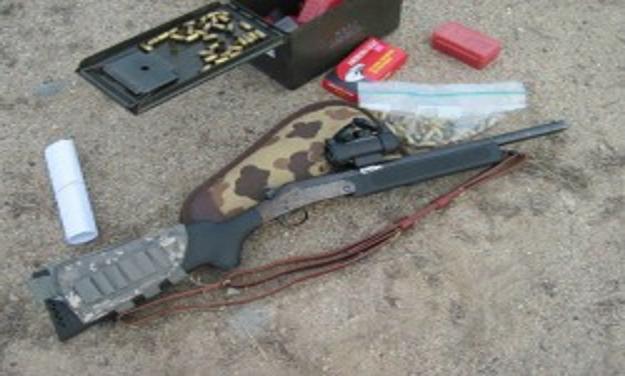
In a classic example of “Do as I say, not as I do”, I’m going to tell you that for the purposes of this 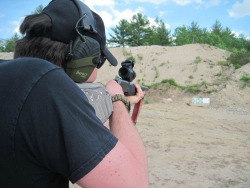 article, I did try shooting some cut shells. I decided on doing an absolute minimum number to do a single “danger test” and then to get a 3-shot group to test the accuracy. I borrowed my brother’s H&R break-open 12-gauge shotgun, since it had a couple things going for it that would help my testing. Number one, it had no choke, as he had shortened the barrel to 20”. Number two, he’d found a very clever way to mount red dot scope, which provided me with a nice precise point of aiming. Number three, it was a single-shot break-open. No moving action parts to catch my shell and tear it open. Number four, it was an inexpensive shotgun and if I blew it up testing it, I wouldn’t have to pull as much out of my wallet to replace it – provided my medical bills weren’t too high. I had a partially opened box of Winchester 2 3/4” shells, loaded with general purpose 7 ½ shot, low brass loads.
Also Read: Survival Shotgun Accessories You Actually Need
I pulled out five of them, and using a utility knife, cut four of them up to test. I held them up to the light, and was able to just see the dark band of the plastic shot wad. Using this as a guide, I cut just below it, about 1” up from the rim of the shell. I did find that the shell did sort of stretch out, if you will, when cut – I would say the wad is under a little bit of tension. This gave my shells a funky bent look – and definitely ensured that these wouldn’t be run through a repeating shotgun; they would have been torn open for sure.
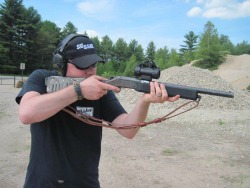
My father came along to the pit to play photographer and to keep an eye on things in case they went  awry – better safe then sorry! We headed to the sandpit and dialed in some other firearms, and eventually we got around to digging out the H&R and the four mutilated shells I’d made. We set a couple paper targets up at 25 yards and dug out the camera. After a couple photos, I took the scope off in case the gun blew up (less expensive that way), and held the gun out at arm’s length, turned my head and body away while pointing it at the bank, and pulled the trigger.
The gun went off, no problem. I stole a glance and was happy to see that there were no ka-boomed shotguns in my hands; everything looked fine. There was a divot in the bank where the projectile had hit, so I knew something came out of the end of the thing. I thumbed open the barrel, and was rewarded with the gun opening smoothly but the ejector did not actuate, leaving me with a stuck shotgun hull in the chamber. Interesting. I couldn’t get enough purchase with a fingernail or tip of a pocketknife to remove the shell, so I assembled my range rod and plunked it out from the muzzle end.
An inspection showed that the cheap aluminum base of the shell had bulged slightly, just enough to 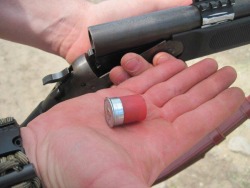 stick the hull in the chamber and resist the pressure of the ejector. There were no barrel bulges nor where there stuck pieces of hull casing in the barrel; everything had performed as needed. Encouraged, I mounted the scope, loaded another cut shell, and lined up for some offhand accuracy work. The results? Surprisingly good! The three shells landed on target in pleasingly close proximity, especially when you consider I made them with zero thought to precision while sitting at my kitchen table with a utility knife.
Also Read: Understanding Shotgun Loads
A group of three huge holes stood out glaringly from the target, in a cluster about 4” across. Recoil was very manageable, frankly much less than I’d expected. In fact, the recoil wasn’t much more than the follow-up standard birdshot control round I touched off immediately after. I then dug out the three Federal “Maximum” 2 3/4” 1 oz. slug rounds I had brought with me. I wanted to try these out as a control – to see if the accuracy of the cut rounds could match the accuracy of the real deal. As it turned out, the cut shells shot as well or better than the real slugs, probably due to decreased recoil – the 1 oz. slugs really booted out of that light little shotgun.
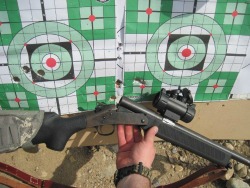 The real slugs were actually grouping almost off the paper, way off point of aim; the cut shells were just a couple inches to the left of point of aim. In the photo below, the group on the left was from cut shells, real slugs on the right. As a side note, the brass-based slug shells ejected out of the shotgun beautifully; I’m guessing the cheap Wal-Mart aluminum hulled shells don’t play nice with this particular shotgun.
Conclusion
For the reasons I explained above, I will not use cut shells for general purpose use; my curiosity is satiated after trying them out for the purposes of this article. However, it is good to know that there is an alternative to the shotgun slug that can be had in dire emergency situations. Standard birdshot – even buckshot – is just not optimal for dispatching large game at longer distances. While I wasn’t able to do any ballistic testing (someone should forward me a recipe for ballistic gelatin!) or big game hunting with the cut shells, I have no doubts in my mind that they will be a vast improvement over birdshot when precise shot placement and deeper penetration is required. I’d hunt deer with these in a heartbeat if I needed to feed my family.
So, do me a favor – don’t do this unless it’s all you have and the chips are really, REALLY down. The possibility of blowing your shotgun or perforating your body just isn’t worth it. But keep it in the back of your mind, as a small trick that may someday keep you and your family alive or safe. Trust me, it works OK… in my brother’s shotgun. Come to think if it, let’s just shorten this to “Don’t do this.”
by Drew

