Outfitting the Ruger 10/22 Takedown for SHTF Duty: Since its introduction in March, 2012, the Ruger 10/22 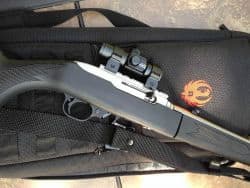 Takedown has set the survival world on fire. Finally, survivalists and outdoor enthusiasts had an esteemed rifle design of known reliability, quality, and accuracy that broke down easily – no tools required! – and stowed into an easily-managed included pack. With other existing takedown .22 LR designs like the Armalite/Henry AR-7 and the Marlin “Papoose” either impossible to find or of…questionable…reliability and accuracy, the everyone-loves-it 10/22 quickly became the gold standard of survival .22 takedown rifles.
By Drew, a contributing author of Survival Cache & SHTFBlog
Ruger 10/22 Rundown
The Ruger 10/22 was introduced in 1964, and immediately became popular due to its low cost, innovative and  compact 10-round flush-fitting detachable rotary magazine, quick and intuitive handling, and now-legendary reliability and accuracy. The original .22 Long Rifle caliber branched into a since-discontinued .22 Magnum variant, a well as a short-lived .17 HMR model. Many variations have been available over the years, including dedicated target models, youth models, and “tactical” models with flash suppressors and other “tacticool” goodies available.
Also Read: Ruger 10/22 Takedown Review
The aftermarket support for the 10/22 is nothing short of ridiculous and amazing. A perusal of a Brownell’s catalog or online search for 10/22 accessories or parts will leave most 10/22 owners wiping away drool and wondering which bill(s) can be pushed off until next month. It’s an accessory wonderland that rivals the popularity of the AR-15 and 1911 offerings…and it’s just awesome.
The standard 10/22 Takedown (TD) comes standard with a black synthetic stock, an anodized aluminum reciever and stainless steel 18.5” barrel. The barrel turns and pulls out of the receiver once the bolt has been locked back and the knurled locking nut has been loosened, breaking down into two sections that stow away into a padded case. The case sports two pouches on the outside (one with MOLLE straps) for extra magazines, ammunition, hearing protection, or whatever else you deem fit to keep with the rifle. On the inside of the case, there is one larger velcro-secured pouch that houses the receiver and rear stock assembly, and two smaller pouches, one of which holds the barrel and front stock assembly. It’s a great, reasonably well-thought-out system that is immediately attractive to many.
Downsides of the Ruger 10/22 Takedown
However, in my eyes, the Ruger 10/22 Takedown doesn’t roll off the factory floor in what I would like to call “survival 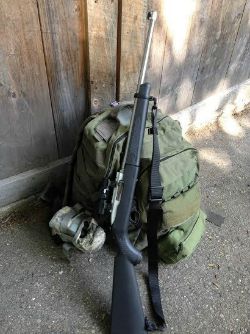 optimal” configuration. It will certainly work, and work pretty well, in a pinch…however, I’d definitely add a couple smallm not terribly expensive items that make it much more user-friendly for whatever purpose I may use it for. Call it “mission optimization”…and my mission for a takedown .22 is mainly for small game foraging. (and, of COURSE, lots of entertaining range time eradicating rabid charging soda cans.) Yes, I suppose that if I had to, I could use it for self-defense – but I think at almost any range under 30-40 yards, a high-quality, accurate 9mm or larger handgun will probably do a better job in that department than a .22 rifle. Flame away if you wish, I’ll say that a .22 rifle isn’t my first choice for close-range self defense unless it’s all I had. But I digress.
Related: 7 Ruger 10/22 Accessories You Actually Need
I have two major beefs with the Ruger 10/22 Takedown, and both of them are detrimental to what I think this rifle would primarily be used for. Here’s what they are and how they can be easily fixed to transform a good rifle into a better one.
Shortcoming #1: Sights
The sights that come with a stock Ruger 10/22TD are a simple brass bead front sight and a folding “buckhorn” type  rear sight. Now, I LOVE a nice fine brass-bead front sight, so kudos to Ruger for incorporating that out at the end of the barrel. However, the sight picture offered up by the buckhorn back sight leaves so much to be desired, especially when you consider the aftermarket sight support that graces the 10/22 platform. Yes, I know that factory standard buckhorn sights have harvested millions of animals and perforated millions of targets, as well as having helped untold numbers of first-time shooters cut their teeth on shooting. But, no matter how you look at it (or through it), they just plain suck. A simple aperture/peep type sight will improve your view of the target, help you intuitively line up the sights, and basically be more accurate, more quickly. How can you go wrong, especially when great sights are readily available, for not much money?
There are many different options, but the ones that catch my eye (pun intended) are the Williams “Ace in the Hole”, and the NoDak Spud sight. These offerings combine aperture style rear sights with Picatinny rails that allow you to also mount optics while keeping the rear sight mounted. Pretty cool. As a bonus, you can just flip down the standard Ruger rear sight and use it as a tertiary sight in case your aperture gets banged up or otherwise put out of action. I haven’t yet chosen one of these sight setups for my pictured rifle, but you can bet one is going on ASAP.
One thing I’ve always loved about aperture sights is how much it eases carrying of the rifle in your hands. To this day, even as I have reached the point in my aging where apparently body parts and systems start going downhill as opposed to uphill, I stubbornly insist on aperture sights for my hunting rifles, unless I’m going to be sitting over an area where I know I’ll be shooting a long distance that requires a scope. An aperture sight on a light, quick-handling rifle like a Winchester 94 or Marlin 336 means there’s no obtrusive scope in the way of wrapping your hand around the receiver right at the balance point. It’s indescribably better for close-in woods hunting, where you need to keep your rifle in one hand for a quick shot, but you need an open hand to push branches, etc., out of the way. That’s my two cents, back to the sights on this 10/22.
To maximize the usefulness of these rear sights with integral scope mounts, I’d set it up with a set of quick 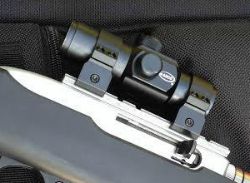 detachable scope rings like the excellent Warne QD offerings. I’ve used Warne rings on many rifles, and they are of the highest quality, fit on Picatinny rails, and, best of all, retain zero, even after hundreds of removal/remountings. I can’t recommend them highly enough, especially for the price point. Combine the rings with a small, lightweight red dot sight like the ADCO Ranger or a rimfire-oriented (non battery-utilizing!) scope with a 50 or 75 yard parallax adjustment like the Leupold VX-1 Rimfire, and you will be completely set up for sighting the rifle. A quality optic, a backup (or primary!) aperture sight for close-in or fast work, and then a tertiary flip-up buckhorn sight. Gotta love redundancy in a survival rifle!
Shortcoming #2: No Sling Atttachments
The Ruger 10/22 TD doesn’t have any built-in sling attachment points. Yup, truth. For the life of me, I can’t figure out why on earth Ruger would build a rifle with a definite outdoors niche, then not provide a way to keep it on your person easily. The only justification I can think of is that the case has a sling you can use to throw the cased, disassembled rifle over your shoulder – but let’s be honest: a rifle is pretty useless when it’s disassembled. The rifle won’t be apart 100% of the time – it will likely be in your hands or on your person. But if you’re carrying supplies or other items in your hands, your rifle has to go someplace…and sometimes the situation won’t allow for you to take the time to pull the gun apart and stow it in the bag. Yessir, the long gun requires a sling.
Also Read: M6 Scout Survival Rifle Review
I ALWAYS mount slings on long guns that leave the house with me. Even if I’m just going to the range: the sling is useful to stabilize the rifle while shooting offhand, and it makes it easier to bring with me as I go to check the targets – I don’t like leaving unattended guns at the firing line (I shoot at a sandpit, not a formal shooting range.). If you’re outdoors with the rifle, you can hang the rifle upside down on your shoulder or on a tree branch when it’s raining or snowing, so as to keep moisture and debris out of the bore. A sling also serves as a rugged lashing or belt in an emergency, so it’s just a damn good idea to have one.
But, alas, the 10/22 TD does not have any provision for this, so we have to modify the rifle in most cases. There are wrap-around type slings and tie-on D-rings for those who don’t want to permanently modify the rifle or don’t have the tools available, but I’ve never been a fan of the added bulk, and they never seem to go on 100% tight and secured. Installing sling swivel attachments is pretty easy with a couple hand tools and some knowledge; I’ll show you how I did it.
First, I purchased an Uncle Mike’s 10/22 QD sling swivel kit from Amazon. There are kits that have fixed swivel loops that are attached to the rifle, but you have to remember: this is a takedown rifle. When you pull the rifle apart, you don’t want one end of the sling permanently affixed to the forestock, and the other end affixed to the buttstock; it’ll be a severe PITA to stow away. So quick-detchable (QD) sling swivels that are easily removed from the attachment stud are the way to go.
The Uncle Mike’s kit gives you a couple options to work with.
In the package, we find a few things:
1. Two screw-in type swivel studs: these simply screw into drilled holes in the stock. They have a pretty coarse thread, since they are designed to be driven into a wood stock. This doesn’t work too well for the 10/22 TD’s moulded plastic stock, so we have to epoxy them in.
2. One blade-type sling swivel stud that is designed to be mounted on the front barrel band, clamped between the two ends of the band where they are screwed together on the bottom of the gun.
3. Two Quick Detachable sling swivels for a 1” sling. These can fit in either type of supplied sling swivel stud.
Now, since Uncle Mike’s was nice enough to give us all the parts, we have to make a decision: drill once or twice? 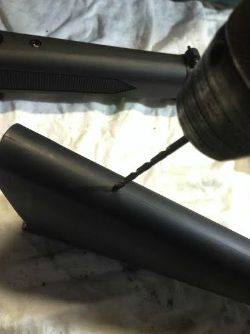 We can either mount both of the screw-in studs (one in the buttstock, one in the forend) or just one on the buttstock and one in the barrel band. I chose the latter setup and collected the tools: a power drill with a 3/16” drill bit, some sandpaper, epoxy, and a flat-headed screwdriver.
First, I marked a line on the bottom of the stock, about 2 1/2” up from the butt. This located where the buttstock stud would be located. There is a moulding line that runs up the bottom of the stock, dead center, so I used this as the centerline for my first mark. I chucked up the 3/16” drill bit in my trusty DeWalt cordless screw gun, and carefully (and slowly!) drilled a hole at my marks. Use care to make sure you’re drilling perpendicular to the stock profile: this ensures that the sling swivel stud will sit flat against the stock when it’s screwed in. I mounted one of the quick-detachable swivels to the stud, and used that for a little bit of leverage to screw the stud into the stock. I started the threads on the stud, then stirred up a small amount of JB-Weld epoxy. Once it was properly mixed, I applied a glob to the threads of the stud, then finished screwing it into the stock. I wiped off the excess and set it aside overnight to cure.
Related: Ruger 10-22 vs. Smith & Wesson 15-22
For the front band-mounted swivel, I did the obvious thing first: I unscrewed the clamping screw, opened the band 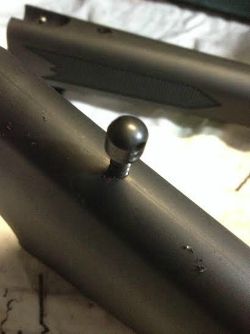 up a tad, and inserted the swivel. After pushing the screw through and tightening, it became very apparent to me that it wouldn’t be that easy, for the barrel band slid right off the gun. The blade of the swivel is wide enough so that it opened the band up enough so that it didn’t clamp. OK, back to the drawing board….
Since the barrel band is just plastic, I took it all apart again, and removed the screw and its nut (buried in one half of the band). I took a piece of 80-grit sandpaper and folded it in half, so there was abrasive on both sides of the paper. Then, after opening the band up a bit so it straddled the sandpaper, I slowly rubbed the band back and forth, trying to remove the plastic on both sides of the swivel/screw area evenly. It took some patience, and a lot of trial-and-error, but eventually I removed enough material so that the blade sat inside the band and the whole works sat securely on the gun. I purchased a black nylon sling, and after threading it through the supplied swivels, I now have a nice, secure sling setup that can be used once the rifle is assembled. The sling dismounts from the rifle with zero effort, and everything stows nicely in the Ruger carrying case.
Other Annoyances
With those two modifications behind us, there are some other less-pressing issues that kinda bug me, but not enough to get me up in arms about HAVING to fix them immediately. One of them is the 10/22 bolt hold-open system. It’s a complete pain in the ass…there, I said it. However, it IS functional, just different. It’s almost impossible to use with one hand, and once the bolt is locked open, a simple tug-and-release of the bolt charging handle doesn’t disengage the bolt stop and send it forward into battery after picking a round up from the magazine – you know, like how practically EVERY OTHER semi auto firearm in the world works.
There is a quick, cheap fix for this, though: the Volquartsen 10/22 Auto Bolt Stop. They’re less than 10 bucks through Amazon, and they are easily installed. I watched this YouTube video from TriggerShims.com and had the Volquartsen piece installed in a few minutes. Definitely worth the trouble, and now my 10/22 works the way I feel it should, and I don’t have to train with different firearms’ reloading techniques. Winning.
Another small issue is the fact that the flush-fitting 10-round magazines are rather difficult to extract from the gun. Again, it’s not awful, but it takes a bit of finagling to get it out of the magazine well. Larger-capacity magazines, like the Ruger BX-25, don’t have the issue because they have real estate that projects outside the gun that one can muckle onto for leverage. But the 10-rounders require you to squeeze the magazine release while pinching the magazine fore and aft, and then wiggling it around a bit to remove.
Also Read: The Katrina Rifle
Yeah, I suppose I could only use larger-capacity magazines, but some locales don’t allow them for hunting, or allow them at all!This is a moot point post SHTF, but I like using my guns for hunting, etc., now. And right now I don’t like arguing with the magazine just to remove it and refill it to keep the fun rolling.
A cool solution that I’ve found is a magazine floor plate called the Tandemkross “Companion” floor plate. They’re about 10 bucks and extend the floor plate for easy gripping. There is also a spring-loaded floor plate called the SLAM Magazine Base that helps eject the magazine under spring tension. Either of these would definitely help mitigate the magazine extraction issue. I haven’t tried them but they’re on the shopping list.
Bitch Session Over
Okay, now that I’ve gotten all that off my chest, I will say that I really do love my Ruger 10/22 Takedown. It’s a simply awesome (and extremely fun!) way of having a small, lightweight, effective foraging rifle with you wherever you go (laws permitting.). All my complaints above shouldn’t detract from the fact that all in all, it’s a great platform that accomplishes, quite effectively, what it sets out to do. And with the 10/22 TD readily available for less than $400, it really makes a great choice for someone looking for a rifle for their truck, boat, airplane, or Bug Out Bag. The modifications I’ve suggested above just make it better…even optimal in my eyes.
Costs for this whole setup? If you have the tools, that’s of course a big plus. Plus if you have an optic kicking around ready to use (Like I did for the pictured ADCO Ranger red dot), that’s a huge cost savings. But the main-item breakdown is:
–Williams ‘Ace in the Hole” Sight/rail: $62.99
–Warne 1” Quick Detachable Low Mount matte rings: $56.42
–Uncle Mike’s QD sling swivel set: $10.11
–Volquartsen 10/22 Auto Bolt Release: $9.00
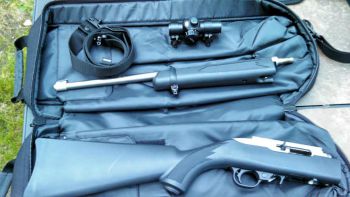
Those adds will be a great foundation to your personal customization..everyone has their own personal opinions in slings, optics, magazines, etc. Go peruse MidwayUSA or Brownells for 10/22 gear and start the list like I have. It’s addictive, I’ll tell you… Any thoughts? Do you have any thoughts or modifications that you’ve done to your 10/22 TD to make it a better SHTF/emergency foraging gun? Sound off in the comments!
by Drew


