Last week on National Geographic’s American Blackout we got to see a lot of common problems presented as the result of a power grid collapse that lasted 10 days. One problem that everyone faced, but didn’t receive a lot of air time was the lack of drinking water. National Geographic did not demonstrate any methods for obtaining water other than going to the store, or as in the case of the people trapped in the elevator and eventually the roof of a building, collecting some from a bucket that had been left in the rain. Since water is one of the most important elements for our survival I wanted to go over some methods of storing water and treating water that could help you in a disaster situation. You must have water if the grid goes down and you expect to live.
If you find yourself without power as they did in American Blackout, food and water were their priorities. Safety and security weren’t big issues until people started living without food and water. The nice veneer of society will vanish in a few days max even if we are only living through a power outage. Can you imagine if there was sickness or a disease pandemic? Can you envision how chaotic a hurricane knocking your town into the ocean would be? The situation presented in American Blackout gave us a lot to learn I think, but as far as disaster goes, a power grid failure would not be anywhere near as severe as a lot of other possibilities.
Now, I am not try to trivialize the scenario at all. A national power grid failure would be catastrophic but only because people aren’t prepared. I think it’s very telling when you consider how many lives might be altered forever just by not having some electricity. I think it is sad that our world is so dependent upon electricity that millions potentially would starve, riot and die because they were forced to live like our not too distant relatives did. Can you imagine the pioneers if you presented this situation to them? OK, just imagine how horrible it would be if there was no electricity… No what?
Where to find water
Water is everywhere normally unless you live in the desert. That is one reason why not too many people I know recommend living in Phoenix if the grid goes down. For the rest of us that live in closer proximity to lakes, rivers, ponds and streams we have a lot of options for finding water if we are faced with the task of collecting enough to drink. In American Blackout, the people who lived in the city had no water in the pipes because the electricity needed to pump water up into tall buildings was nonexistent. That doesn’t mean there isn’t any water in the city though.
I was surprised they did not have someone manning a hydrant letting people fill up jugs of water. The sheer volume of water contained in the fire hydrant systems of large cities if used properly could have probably lasted a week. Could you have taken showers and washed your car? No, but it is a source of water that could have been tapped into if you pardon the pun.
I could go into making a solar still or collecting the condensation off the leaves of plants with a bag or getting water from a tree even, but that is for another post. I want to talk to the majority of us that have water all around us and we simply need to get it and make it safe for drinking. In that I’ll start with the obvious and that is you should have water for everyone in your family on hand at all times. Water is cheap (relatively) and it is easy to find. You drink it every day now and there is no reason to be without a minimum of one week worth of water no matter who you are or where you live.
I talked about ways to store water in our Power Blackout checklist post last week and you should have a similar plan right now for your family. Don’t wait until the power goes out to run to the store and try to find a gallon or two.
Water in a suburban setting is most easily collected from rain. Once you have rain barrels set up you don’t have to do anything. When it rains, your barrels will fill up and all you would have to do is make sure it is filtered or disinfected. Water can be used from any stream or creek or lake. What about the golf course down the street? You can drain your water heater in a pinch just by opening the drain valve at the bottom. The trick is to look around you for locations that have water in your neighborhood that you might need to access in a grid down scenario, but don’t neglect stocking up on your own. The stream down the road might be dry.
How to carry water
 Humans on average need a gallon of water per day to stay hydrated and provide cooking and hygiene. I think that amount is slightly off because it can’t be the same amount for small children, but who cares. We will use it for a guideline and obviously that guideline has to be adjusted for the scenario you find yourself in. If it’s the middle of summer, temperatures are soaring and you are doing a lot of manual work that amount could easily double. What if you are sick and are throwing up? It’s best to always have more than the average amount of water on hand and you need to have a plan for getting water and bringing it back to your location.
Let’s say you live near a body of water (lake, stream, well, fish pond) and the power is out. How are you going to get water to drink? You could just walk down there and fill up your Nalgene bottle and walk back, but that is going to take a lot of time and energy for something that won’t last long. You need a way to carry a considerable amount of water at one time to reduce your trips and cut down on your risk of being caught out.
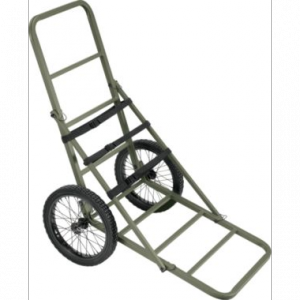
You need to plan now for containers that will hold several gallons of water at a minimum, but carrying these will be difficult without a wagon, cart or improvised method of weight distribution. One of my readers commented that they were planning on using a deer cart to tote their bug out gear and I think that makes a great option for carrying water too. Like the woman in the picture above, running out for a drink of water might not be as simple as it used to be. You have to plan to carry enough back so that you won’t need to go out for another couple of days hopefully.
How to treat water
There are many ways of filtering water and making it safe to drink and I have listed several down below.
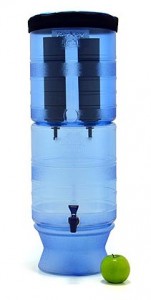
 Filters – Hands down my favorite method of treating water. Why? Because it is the simplest and takes the least amount of energy for the return on investment. I recommend two types of filters to be part of your preps. For my home, I use a Berkey Light water filter. I simply dump a couple of gallons in the top and clean water comes out the bottom. Obviously, you want to ensure you are filtering as much gunk out of your water before you bring it into your filter so as to keep your filter elements clean for as long as possible.
For portable alternatives, I have a pair of MSR water filters. These work great and have kept us in plenty of cool clean water on several backpacking trips with our family. You just pump the water through the pump and clean fresh water is delivered to your water bottle.
Boiling Water – Boiling is probably the oldest method of disinfecting water but it works! All you need is a container (preferably not plastic) and heat. Bring your water to a boil and let the water boil for a couple of minutes and that’s it. The boiling will kill any bacteria and you can drink the water. Let it cool off first
Ultra violet light – there are UV pens that they sell for camping that are supposed to kill any bacteria in water. I have never used these so my assumption is that it may kill the bacteria, it won’t help the taste or make the water technically cleaner. Saving your life is what is most important though so if you have to drink some water that has stuff floating in it…as long as you don’t die from a water borne illness you can live to fight another day.
Chlorination – Chlorine Bleach is probably the most common household item that you will have that can be used to disinfect your drinking water but it is a little tricky. Chlorine is affected by the temperature of the water you are treating. Always try to filter any water that may be cloudy with contaminants such as lake water first. You can use paint filters or a bandana if necessary. If the water is room temperature (meaning not cold or hot) you would add two to four drops of chlorine bleach per quart. Shake well and let the container sit for 30 minutes. After 30 minutes, smell the water. It should smell like chlorine and this is normal. If it doesn’t smell like chlorine add another drop or two and let it sit for 30 additional minutes. By drops we are talking about an eye-dropper size drop, not a dollop.
Distillation – Distillation is another option but requires more equipment than the average person will be able to acquire much less put together in an emergency. Another option is the SODIS method which uses UV light (sunlight) to treat water stored in clear containers. There is a lot of information about this method online and here.
by Pat Henry


